In a world increasingly conscious of dietary needs and nutritional value, the quest for versatile, gluten-free, and protein-rich alternatives to traditional wheat flour has led many to rediscover ancient grains and legumes. Among these, the humble lentil stands out as a true nutritional powerhouse. While often enjoyed whole in stews and curries, lentils can be transformed into a remarkably useful flour, opening up a new realm of culinary possibilities. If you've ever wondered how to make lentil flour at home, you're in the right place. This comprehensive guide will walk you through the simple process, revealing why this gluten-free and protein-packed ingredient deserves a prime spot in your pantry.
Why Embrace Lentil Flour? A Nutritional Powerhouse
Lentil flour is far more than just a gluten-free substitute; it's a nutritional champion ready to elevate your meals. As a registered dietitian, I've seen firsthand how incorporating pulses like lentils into the diet can offer immense health benefits, and lentil flour consistently shines. Derived from a legume that boasts approximately 25% protein, it's an excellent plant-based protein source for vegetarians, vegans, and anyone looking to boost their protein intake without relying solely on animal products.
Beyond protein, lentil flour is exceptionally high in dietary fiber. This means it promotes satiety, helping with weight management by keeping you feeling fuller for longer. Its high fiber content also plays a crucial role in regulating blood sugar levels, making it a smart choice for individuals managing diabetes or seeking stable energy throughout the day. Furthermore, lentils are packed with essential micronutrients, including iron, which is vital for energy production and preventing anemia, and folate, critical for cell growth and development. By swapping even a portion of traditional wheat flour with nutrient-rich lentil flour, you can significantly enhance the nutritional profile of your baked goods, batters, and savory dishes.
For those navigating gluten sensitivities or celiac disease, lentil flour offers a safe and delicious alternative, naturally free from gluten. Its unique composition makes it suitable for a wide array of recipes, from rustic breads and pancakes to thickeners for soups and stews. It's a wonderful way to enjoy the benefits of this remarkable legume in new and exciting forms. To dive deeper into its versatility, explore how Homemade Lentil Flour: Your Nutrient-Rich, Gluten-Free Alternative can transform your cooking.
Choosing Your Lentils: A World of Flavor and Color
The type of lentil you select will subtly influence the flavor, color, and even the texture of your homemade flour. While all lentils offer similar nutritional benefits, their distinct characteristics can be leveraged to best suit your culinary goals.
- Brown Lentils: These are the most common and widely available variety. They offer a neutral, earthy flavor that makes them incredibly versatile for a broad range of applications. Flour made from brown lentils typically has a light brown hue.
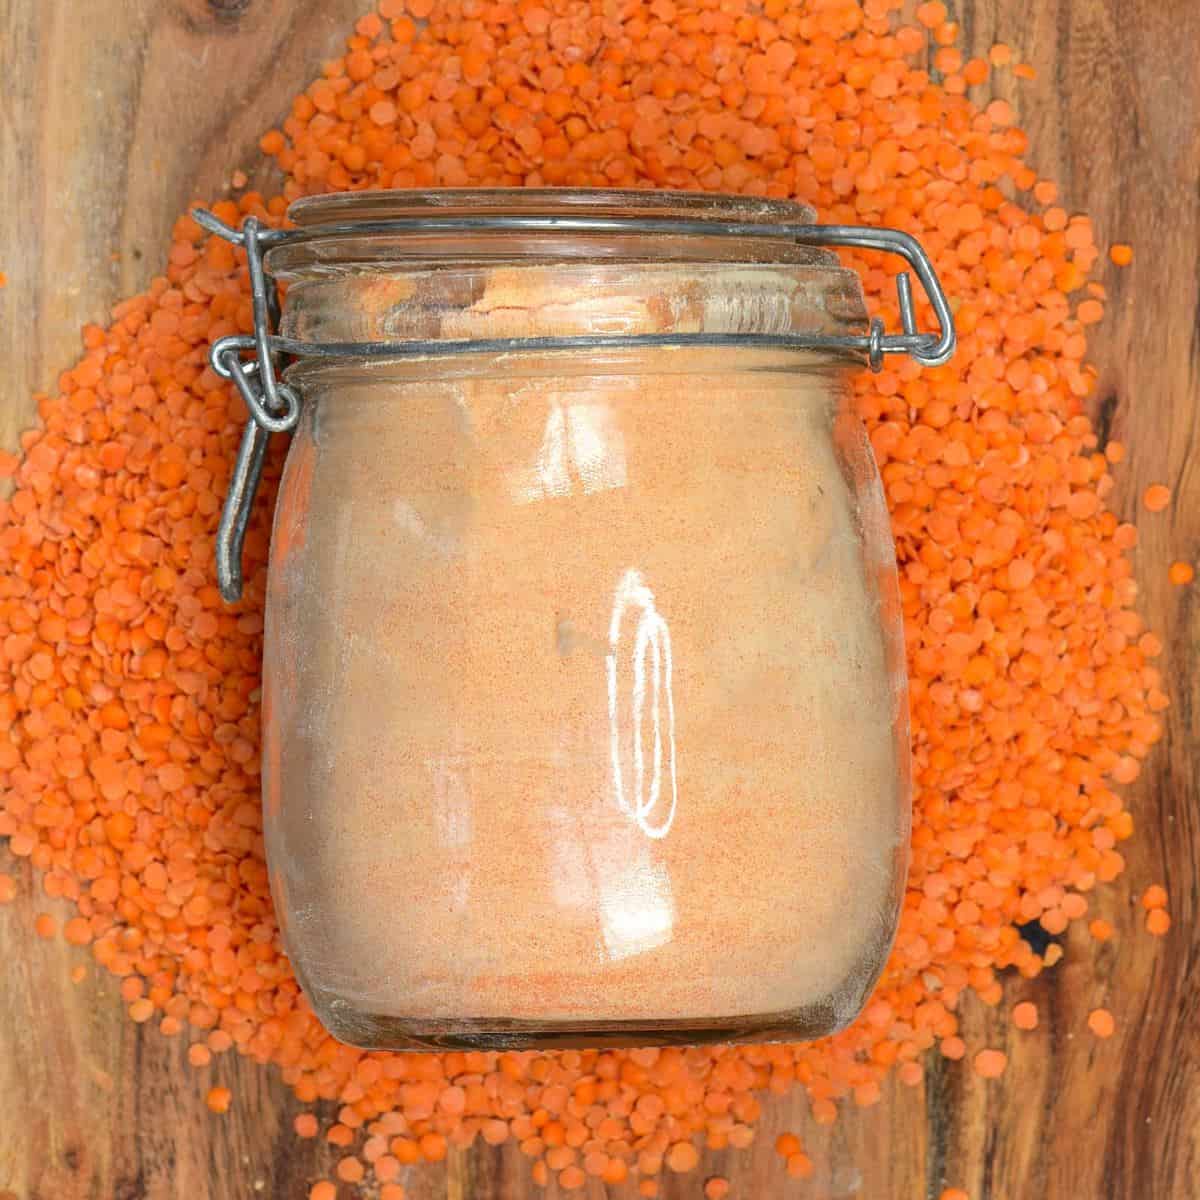
- Red Lentils: Known for their quick cooking time and delicate, slightly sweet flavor, red lentils produce a beautiful, vibrant orange-hued flour. This variety can be excellent for dishes where you want a lighter texture and a hint of sweetness, such as crepes, certain baked goods, or Indian-inspired flatbreads.
- Green Lentils: Providing a slightly earthier and more robust flavor than brown lentils, green lentils create a flour with a subtle greenish tint. Their flour might be preferred for more savory applications where their distinctive taste can shine through.
- Black Lentils (Beluga): Named for their resemblance to caviar, Beluga lentils yield a rich, dark flour with a deep, earthy flavor. This flour can add a unique gourmet touch and striking color to your recipes.
When choosing lentils for flour, consider the end product. For a neutral base, brown lentils are ideal. If you're aiming for a sweeter profile or a specific color, red lentils might be your pick. Don't be afraid to experiment, or even blend different types of lentils to create your own signature flour blend!
Step-by-Step Guide: How to Make Lentil Flour at Home
Making lentil flour at home is a straightforward process that requires minimal equipment, especially if you have the right tools. The key steps involve cleaning, thorough drying, optional toasting, and finally, grinding and sifting. Here’s a detailed breakdown:
Ingredients & Equipment:
- 1 pound of your chosen lentils (e.g., brown, red, green)
- Fine-meshed sieve or colander
- Large baking sheet
- Clean kitchen towels
- Large skillet (optional, for toasting)
- Grinding Equipment: A grain mill (preferred) OR a high-speed food processor/blender
- Fine sieve for sifting flour
- Airtight container for storage
Directions:
- Rinse the Lentils Thoroughly: Place your 1 pound of lentils into a fine-meshed sieve or colander. Rinse them vigorously under cold running water. This step is crucial for removing any dust, dirt, or small debris. While rinsing, visually inspect the lentils and remove any discolored, broken, or foreign particles.
- Dry the Lentils Completely: This is arguably the most critical step. Lay a clean, absorbent kitchen towel on a large baking sheet. Spread the rinsed lentils over the towel in a single layer. Use another clean towel to gently pat the lentils, absorbing as much surface moisture as possible. Allow the lentils to air dry completely, undisturbed, for several hours or even overnight. They must be bone-dry. Any residual moisture can lead to clumping during grinding, potential spoilage, and a less efficient milling process. You want them to be hard and free-flowing.
- Toast the Lentils (Optional, but Recommended for Flavor): Once completely dry, transfer the lentils to a large, dry skillet. Toast them over medium heat for approximately 5 minutes, stirring frequently and consistently to prevent burning. Toasting enhances their flavor, imparting a slightly nutty aroma and reducing any raw "beany" taste. It can also contribute to a longer shelf life for the flour. After toasting, immediately remove the lentils from the heat and spread them back on the baking sheet to cool completely. They must be cool to the touch before grinding, as grinding warm lentils can lead to clumping and affect the flour's texture.
- Grind the Lentils: This is where the magic happens!
- Using a Grain Mill (Recommended): A dedicated grain mill (like a Mockmill attachment for a stand mixer or a standalone unit) is the most efficient and effective tool for grinding lentils into a fine flour. Set your grain mill to the finest setting. Place the completely cooled, toasted lentils into the hopper. Turn on your mixer or mill and grind the lentils. Grain mills are designed to handle hard legumes quickly, producing a very fine, consistent flour without the risk of overheating.
- Using a High-Speed Food Processor or Blender: While not as efficient as a grain mill, a powerful food processor or high-speed blender can also grind lentils. However, lentils are very hard, so this method requires patience and care. Add a small amount of lentils (about 1/2 to 1 cup at a time) to the food processor. Pulse in short bursts, allowing the machine to rest frequently to prevent overheating. Continue pulsing and grinding until the lentils reach a flour-like consistency. You may need to stop, scrape down the sides, and allow the motor to cool every minute or two. The resulting flour might be slightly coarser than what a grain mill produces. For more detailed insights on equipment, see our guide on Grind Your Own Lentil Flour: Grain Mill vs Food Processor Tips.
- Sift the Lentil Flour: Pour the freshly ground lentil flour through a fine-meshed sieve into a clean bowl or container. This step ensures a uniform, fine flour texture, which is crucial for consistent results in baking and cooking. Any larger pieces or unground lentils that remain in the sieve can be sent back through your grinder for a second pass until they are finely milled.
- Store the Flour: Transfer your homemade lentil flour to an airtight container. Store it in a cool, dark place, such as a pantry, where it can last for several months. For extended freshness, especially if you live in a humid climate, consider storing it in the refrigerator or freezer.
Tips for Success & Troubleshooting:
- Bone Dry is Key: Reiterate the importance of fully dry lentils. If they feel even slightly damp, continue air-drying. This prevents clumping and mold.
- Don't Rush Grinding: Especially with a food processor, allow the machine to rest to prevent motor burnout. Small batches are always better.
- Achieve Fineness: For best baking results, a very fine flour is desirable. Sifting and regrinding is your friend here.
- Freshness Factor: Freshly ground flour often has superior flavor compared to store-bought, so enjoy the difference!
- Consider Scaling: While 1 pound is a good starting point, you can easily scale up or down based on your needs.
Beyond Baking: Culinary Uses for Lentil Flour
While lentil flour is an excellent gluten-free alternative for baking, its versatility extends far beyond just bread and muffins. Its unique properties make it a valuable ingredient in a wide array of culinary applications:
- Thickening Agent: Due to its starchy and fibrous nature, lentil flour works wonderfully as a natural thickener for soups, stews, curries, and gravies, adding body and a nutritional boost.
- Batters for Fritters & Pancakes: It's a fantastic base for savory fritters, veggie burgers, and pancakes, offering a robust flavor and binding properties. Think traditional Indian dosas or French socca (chickpea flatbreads), which can be adapted with lentil flour.
- Binding Agent: Use it as a binder in vegetarian or vegan "meatballs," veggie burgers, or loaves, helping ingredients hold together without relying on eggs or gluten.
- Protein-Boost in Smoothies: A spoonful or two can easily be incorporated into smoothies, adding a substantial dose of plant-based protein and fiber without significantly altering the flavor.
- Homemade Pasta & Noodles: For the adventurous chef, lentil flour can be an ingredient in making gluten-free pasta or noodles, offering a unique texture and flavor.
- Partial Replacement in Recipes: When adapting recipes, start by replacing 10-25% of the traditional wheat flour with lentil flour. This allows you to gradually introduce its flavor and understand how it behaves in your specific recipe, as it absorbs liquids differently than wheat flour.
Conclusion
Mastering how to make lentil flour at home is a simple yet incredibly rewarding endeavor. Not only do you gain a versatile, gluten-free, and protein-packed ingredient for your kitchen, but you also unlock a world of nutritional benefits that can enhance your daily diet. From boosting the protein content in your baked goods to acting as a savory thickener, homemade lentil flour is a testament to the power of whole foods. Embrace this easy process and discover the remarkable potential of lentils in their finely ground form – your culinary journey (and your health) will thank you for it!
